Every new iPhone comes with an even better camera. But a good shooter alone is not enough. One must know how to alter its settings to get the finest out of it.
Whether you are average or want professional picture quality, understanding Camera Setting for iPhone will improve your photography skills.
According to a Statista report, iPhone and other smartphone companies dominate the digital camera industry because of the new technology created in smartphone cameras.
This post will simplify the vital camera settings you should understand, explain their functions, and demonstrate how to modify them for distinct kinds of pictures.
The conclusion is that you’ll be well-equipped to take quick selfies or intricate landscape photos like an expert.
Know About Camera Modes
First, gaining as much from an iPhone camera involves understanding its various modes.
Every mode has been designed to suit a certain kind of photography; hence, choosing the right mode is as good as victory won.
- Photo Mode: In a pinch, this is the friendliest option for everyday photos. All you have to do is click the button on the top and it’s done – fast, automatic, and with internal adjustments for brightness and clarity.
- Portrait Mode: It is ideal for snapping pictures of individuals. It creates dimensionality by making the backdrop fuzzed out (the well-known “bokeh” effect), which allows the important person to be highlighted.
- Panorama Mode: With this mode, you can take broad-angle pictures that are ideally suited for sceneries or large group images.
- Night Mode: Whenever the lights are dim, it begin working without any help or intervention from the user. To enable you to take clear pictures even in darkness, longer exposure times are used.
- Video Modes: In iPhone there exist various video settings covering basic 1080p up to 4K with 60 frames per second. However, switching among these depends mainly on what type of video you are shooting.
Understanding HDR: When to Use It
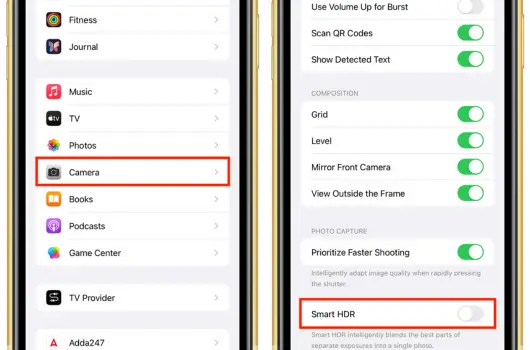
In HDR (High Dynamic Range), it will be easier for you to have the correct light with the dark areas in your picture.
For creating a more balanced image, the iPhone will capture automatically several versions on different exposures of the same shot and then mix them up together.
- When to Use HDR: In a sunset or a brighter background where there are darker foregrounds, it’s suitable. HDR has the power to prevent highlight saturation and shadow underexposure.
- When to Turn It Off: While capturing quickly moving subjects it is important to stay away from HDR mode. Since several images are taken by the camera and joined, motion may cause distorted images.
Live Photos
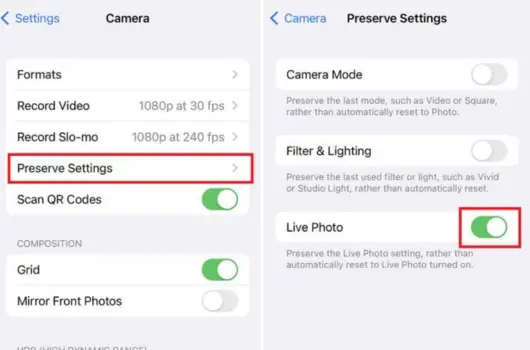
The Living Photos are basically video clips kept with your static images. With this function, it records one and a half seconds before as well as after when you press the shutter button which makes your pictures feel alive.
- Best Use of Live Photos: When it comes to taking pictures of individuals, creatures, or images in motion, Live Photos make them more interesting. This is especially nice when one desires to recollect an event; simply tap and hold on to the picture and you will see it come back to life.
- When to Turn It Off: Since these files take up more room than regular pictures, switch off the Live Photos in case storage is a problem. In addition, for any serious photos where accuracy matters, you may not need the motion part either.
Adjusting Exposure: Control the Light
The amount of light that a photo receives determines its brightness or darkness. Even though the iPhone automatically adjusts the exposure very well, there are moments when you will have to take charge.
- How to Adjust Exposure: On display, indicate the area that should be in focus for the camera. There will be a tiny sun symbol affixed beside the focus square. Move the sun upwards if you want more light captured or downwards if less light is required.
- When to Adjust: In difficult lighting situations, exposure is critical. If it is a bright sunny day and you are taking pictures, make sure to reduce the exposure so they do not overexpose. On the other hand, in dark places increasing this technical aspect can help bring out intricate features.
Focus Lock
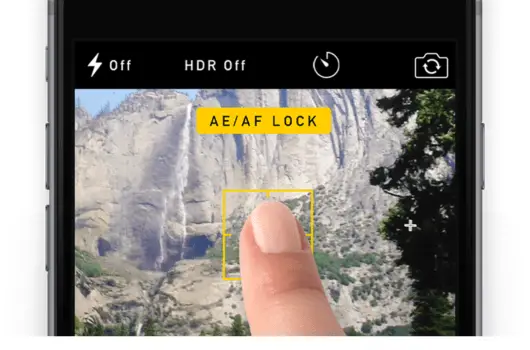
The iPhone’s autofocus is generally reliable, but in situations where the focus might shift (like a busy street or an object moving in front of the camera), locking the focus ensures the subject stays sharp.
- How to Lock Focus: To lock the focus and exposure, tap and hold on to the subject until you see a message saying, “AE/AF Lock” displayed on your screen. This is an indication that both focus and exposure have been locked so that wherever you move your camera, it will not change.
- When to Use It: When taking portraits, close-ups, and any subject you wish to keep in focus only, lock your focus.
Burst Mode
For fast-moving photography, Burst mode is like a godsend. Pressing down the shutter button consecutively takes several pictures at once which may later be chosen as best.
- Best Time to Use Burst Mode: Burst of sports activities, children who are racing, or simply any time passing by like a flash. The burst can be sorted and one can get the shot with the best composition and by the right timing.
- How to Access: On newer iPhones, swipe the shutter button to the left to activate burst mode.
ProRAW and HEIF/HEVC
From the time of the introduction of the iPhone 12 Pro and newer, Apple has been able to introduce ProRAW thereby giving control of editing to photographers who are taking photographs while shooting on smartphones.
On the other hand, HEIF/HEVC formats compress file size in such a way that too much quality is not lost.
- ProRaw: It is like the way that shooting in RAW on a DSLR camera is done. In this case, you will have more information in your photographs, which will be good for editing purposes. The downside to this is that ProRAW files tend to be bulkier and take up considerable space.
- HEIF/HEVC: The image and video file size can be decreased using these formats without much loss of quality. They are perfect for everyday shooting when you want some space savings while getting beautiful pictures.
Portrait Lighting
The Portrait Lighting option on iPhone allows you to create studio-like lighting on your portrait pictures. Below is a list of the different choices available:
- Natural Light: The default setting adds a soft focus to the background while keeping the subject sharp.
- Studio Light: Brightens your subject’s face and gives it a clean, well-lit look.
- Contour Light: The use of shadows enhances the dramatic effect as well as creates an image that has higher contrast.
- Stage Light and Stage Light Mono: It totally makes the background black, making all your focus on the subject alone, either in black and white or color.
Also, read this:
- 8 Free Personal Safety Apps: Protect Yourself on the Go
- 6 Methods to Transfer WhatsApp from Android to iPhone
Gridlines
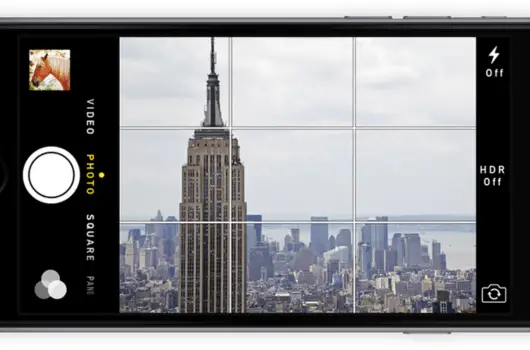
Did you ever see the grid lines section in your iPhone Camera settings? It’s an effective instrument for enhancing the configuration of your images.
- Rule of Thirds: To compose good photographs, many photographers use ‘rule of thirds’. Imagine that you could split your screen into a 3×3 grid. This can help make your photo more attractive; just position the subject on the lines but more so where they meet.
- How to Turn on Gridlines: Go to Settings > Camera, then toggle on “Grid.” It’s simple, but it makes a big difference in how your photos are framed.
Using Zoom
When you zoom into an object, it usually feels like you’re approaching it even if at times the image quality is reduced especially with digital zoom.
Your iPhone camera has optical and digital zoom options; understanding their differences can save your shot.
- Optical Zoom: Optical zoom utilizes the lens for zooming in without compromising on quality, and this can be found in iPhone models with dual or triple-lens setups. Utilize it as much as possible.
- Digital Zoom: Pinching to zoom is essentially a way of applying a digital zoom. This leads to cropping and enlarging the image thereby losing its sharpness and details. Where possible it is advisable to move closer to the object rather than depending on a digital zoom since it is more effective in this way.
Night Mode
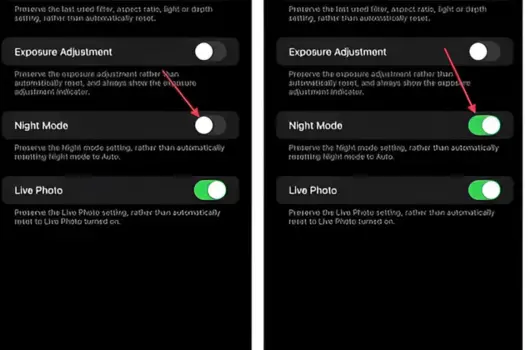
Incredible is the night mode found on iPhone provisions, which automatically changes the exposure when it gets dark.
Brighter, sharper night images are produced by a longer exposure time of the iPhone, thus allowing more light to be captured by the sensor.
- How to Use Night Mode: As soon as your iPhone detects low lighting conditions, a small crescent moon Night Mode icon will show up in the top corner. You can manually tap on the icon to adjust exposure time while sliding the timer.
- Pro Tip: You should use a tripod or try and keep your hands as still as possible. Since Night mode uses longer exposure times, any movement may cause blurriness in the photographs taken.
Macro Photography
In October 2023, you were trained on data until then. iPhone 13 Pro and later released an updated macro mode capable of magnificent close-up shots.
Whether it is a flower’s petal or an insect, the close-up images obtained reveal amazing textures invisible to the naked eye.
- How to Access Macro Mode: As an iPhone gets close to something, it instantly goes into macro mode. You can notice when the lens changes position, and also when the sharpness has been adjusted for minute utensils.
- Best Uses: Ideal for nature photography, product shots, or any situation where you want to highlight fine details up close.
Final Thought for Camera Setting for iPhone
Having the latest model is not all it takes to take great pictures with your iPhone; it is also important for you to know how to make the best use of its settings.
This means learning about how each mode works and when to change exposure as well as utilizing tools such as ProRAW, Portrait Lighting, and Night Mode that will turn everyday snapshots into professional-looking images.
Be not afraid to mess around with different settings, try out stuff that works best for you. The more practice you have, the greater you will be able to understand how each characteristic helps you take an ideal photo.
And guess what? All you need is an iPhone and a few tips—no expensive equipment required!
2 thoughts on “Best Camera Setting For Iphone: A Practical Guide”